Most people tend to use the setup wizard provided on the iPhone which creates an IMAP Email account by default. However, some users may prefer to use a POP3 email solution on their devices.
Luckily, Apple has provided flexibility when it comes to setting up email accounts on your iPhone. You can choose between IMAP or POP3 based email accounts on your device.
Apple provides the ability to setup POP3 email on iPhone, and other Apple devices.
It is not a difficult process but it is more complex than using the wizard. It only takes a few minutes and this quick guide explains exactly what to do.
Advertisement
Steps to set up a POP 3 mailbox on your iPhone
1. Find out the following information and make a note of it:
- Your email address
- Your email password
- Your Incoming IMAP server
- Your outgoing POP server
If you are unsure about your incoming and outgoing server details then contact your email account provider, or read my list of iPhone email settings for most companies.
2. Press the Home button and choose Settings.
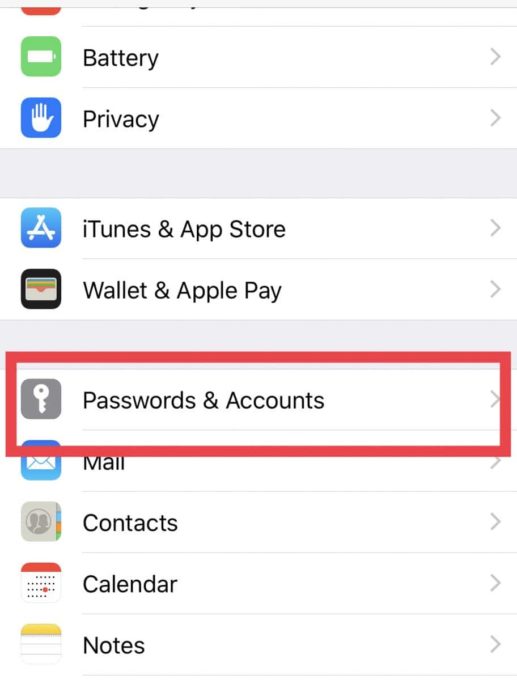
3. Scroll down and click Passwords & Accounts
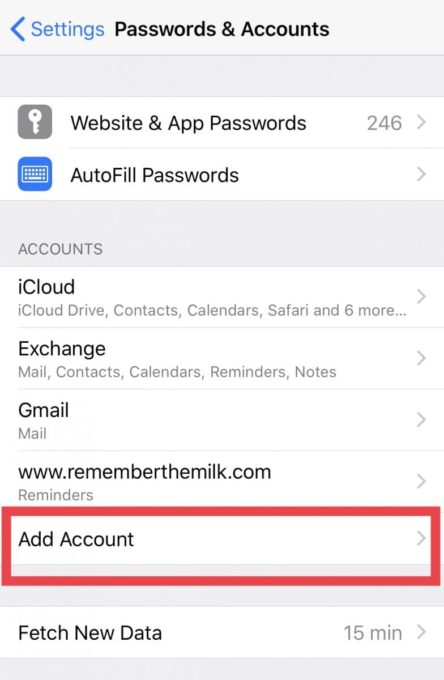
4. Click Add account
5. Scroll down and select ‘Other’ from the list

6. Select ‘Add mail account’
7. Type in the following information to the screen (you should have made a note of these things in step 1)
Name: Your full name. This will appear as the sender name when people get an email from you
Email: Your email address
Password: Your password for the email account
Description: You can type anything as your description but I would suggest you use your email address
Advertisement
It will then go and look up your account.
8. Click Next at the top right of the screen.
9. Click POP at the top. It should turn blue when you select it.
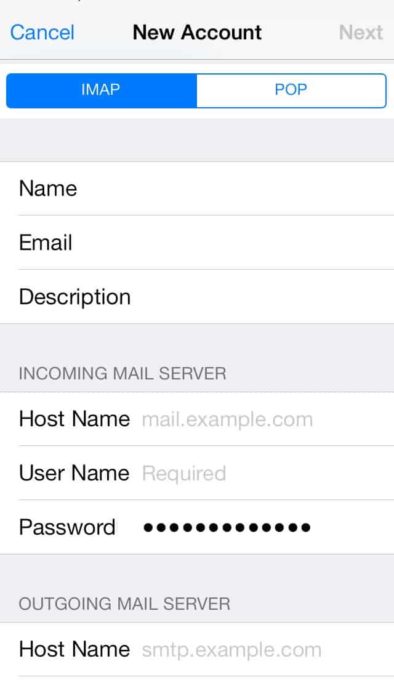
10. Name, Email, and Description should be already filled in as you added these earlier.
Fill in the user name, which is normally your email address together with the incoming and outgoing host server information (you should have made a note of this in step 1).
11. Click save at the top right and your iPhone, iPad or iPod Touch will verify your settings.
12. Next, you need to check you are using the correct ‘port numbers’ for your email account.
Once the account details have been saved you will go back to the Mail, Contacts, Calendars screen. Click your account from the list.
13. Scroll down and select Advanced

14. Type in the port number and choose if you want to use SSL for incoming email (most email accounts use SSL as this protects you and keeps your messages private).
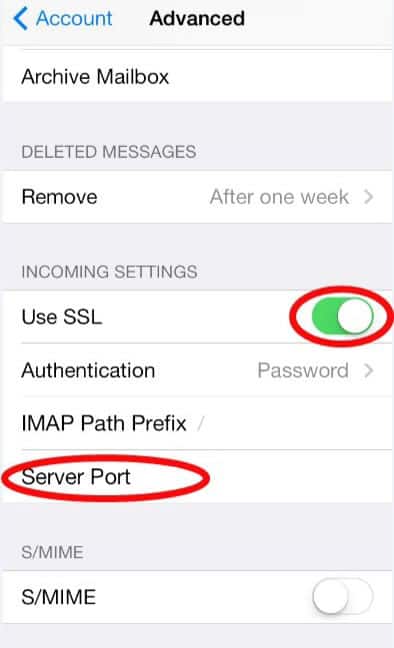
15. Click the button at the top left to return to the previous screen.
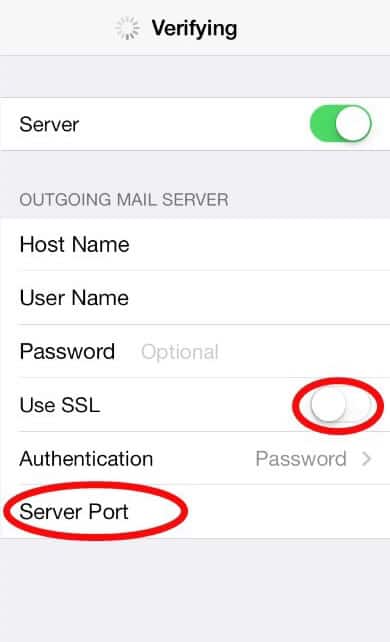
16. Click on the outgoing hostname on the screen (you will have got this in step 1).
17. Type in the port number to use for your outgoing mail server.
Remember that if the port uses SSL switch it on. If not, make sure it is switched off or you will have problems sending emails.
See how to fix the “Message not yet downloaded from server” iPhone Email Error,
FAQ’s
POP 3 or IMAP – which is the best?
It depends. IMAP is best if you access the same email account on many different devices.
For example, if you have a personal email address that is setup on a computer, phone, or tablet.
Why?
IMAP allows you to read, reply, and delete messages on one device, and then these changes are automatically synchronized across to the other devices.
So if you read a message on your iPhone then check your messages on a desktop computer the same message will be marked as read there too.
It does have one drawback…
…it uses far more space because all of your messages are kept in an account ‘in the cloud’.
The number of messages can soon spiral out of control resulting in a huge mailbox.
POP 3 is different.
It downloads all the messages from your mailbox onto the device you are using to view them.
So if you read a message on your smartphone it will be downloaded to it. If you then go to your computer then the message will not appear because it is now on your phone. No synchronization occurs.
This can make it very confusing to know where a message ended up if you use multiple devices so it best suited to people who only ever use one device.
One bonus of POP 3 is that it can be configured to not keep a copy of messages on the server meaning it doesn’t use masses of space ‘in the cloud’. Instead, all the messages are stored on your device meaning it has to have the ability to store the messages.
With the smallish storage options available for iPhone, iPad, and iPod Touch this is probably going to run out quickly.
How to fix the “Message Could Not Be Moved To Mailbox Trash” Email Error.
Why use POP 3 on iPhone?
POP 3 email accounts have some advantages:
- Mail is stored on your iPhone, so it’s always accessible even without an internet connection.
- An internet connection is needed only for sending and receiving messages. Everything else can be done without an internet connection.
- It saves storage space on your server because are deleted automatically when they are downloaded to your iPhone.
- It is flexible so you can leave a copy of the email message on the server if you wish.
Choose POP if:
- You only access your mail from your iPhone, and never plan to access it from another device.
- You need access to all your emails.
- You don’t have a reliable connection to the internet.
- You have limited server storage for your messages.
Thank you for the guidance.. It does work.
Another call out for post office broadband outgoing mail settings.
It’s January 2020 and I’m running Catalina on my Mac and the latest iOS on my phone. To my surprise, it appears that the option to choose between IMAP and POP has disappeared. Is this true? Is there a new way to set up a POP account?
I have this problem only when moving emails from one folder to another. Initially I can read the whole message contents but then after moving to a storage folder, I can no longer see the email contents and get the “not downloaded from server” message.
Also, could you add the details for Netaddress (USA.net) as i’d Like to switch from POP3 to IMAP if that’s really the issue.
Thanks,
Jason
Thank you for the guidance.. It does work.
Wow, this is great article submission and also content quality is good..thanks for sharing this..for more knowledge check my site which is related to hp printer not printing black.
Funny story … I have two hotmail accounts. One works with IMAP the other not … f*ck Microsoft.
I have a globalspirit.net e-mail address but can only receive but not send. Can you advise me of the correct outgoing settings. Many thanks Roger
Hi I’m having problems with my pop3 email freeserve can you supply IMAP settings for this email?
Thank you
Free serve was bought over by orange, which was merged with EE and unbelievably they don’t offer IMAP:
http://ee.co.uk/help/mobile-and-home-connections/broadband-gallery-mobile-broadband/fibre-broadband/home-broadband-email/broadband-email-settings
The information provided for Verizon is outdated and the port assignment is incorrect
I have updated the details for Verizon with the current details.
If I have Bright House should I use road runner?
If I have Bright House should I use road runner?
I found your blob very useful and followed all the steps, however, I can receive emails for iCloud and hotmail using the servers but I cannot for love nor money get the outgoing server to send my mails on my Mac Pro. I can however send them from my iPhone using exactly the same info. I am beyond frustrated and want to fix this. I have had ongoing problems like this for months. Somedays it just fixed itself by itself but when I took things into my own hands and followed your instructions from scratch it is not working. VERY FRUSTED. : (( Any assistance would be most welcome as I feel I can trust you. thanks Elizabeth
Hi there,
Please can you help me? I have an email account at the above address, I have no problems sending or receiving mail on my iPhone or iPad, however it is not storing copies of my sent messages. My Outgoing Mail Server is SMTP secure.emailsrvr.com
I was also having a problem with moving messages to this address to trash, but thanks to the information on your site I think I have resolved this.
Everything published was actually very logical. But, consider
this, suppose you were to write a awesome headline?
I mean, I don’t wish to tell you how to run your blog, however what if you added a title to possibly grab people’s attention?
I mean Incoming and Outgoing Mail Server Settings For Most ISP’s is a little boring.
You could peek at Yahoo’s front page and watch how they create article
headlines to grab people to click. You might add a video or a pic
or two to get people excited about what you’ve got
to say. In my opinion, it could bring your website a little bit more interesting.
Aw, this was an extremely good post. Taking a few minutes and actual effort to create a top notch article… but what can I say… I put things off a whole lot and
never seem to get nearly anything done.
Fantastic website. A lot of helpful information here.
I’m sending it to some pals ans additionally sharing in delicious.
And of course, thanks to your effort!
can’t find winntel.net is my mail carrier
Trying to set up my godaddy email to my MacBook ~ any suggestions as I keep getting the “enter password” which does not work.
Thank you
Here’s an interesting twist. I can’t send e-mails from my new iOS 7 device because our outbound POP3 server does not require authentication (I know, I know – our service provider is a bit behind the times). iOS 7 does not include a “None” option for authentication but insists that either a password, MD5 challenge-Response, HTTP MD5 Digest, or NTLM is required to authenticate. Because our service provider doesn’t accept any of these authentication mechanisms I can’t connect to send e-mails. Because we aren’t permitted to connect to Webmail from work, this little iOS 7 issue prevents me from sending e-mails. Looks like I’ll have to switch to another provider. What a pain…
Hi Kevin,
I am trying to set up my which.net email account on my Samsung Galaxy mini but cannot find the port numbers for the incoming and outgoing servers, they are not on your list. Can you help?
Thanks
hello, I have an iphone 4 and have been using btinternet.com emails with this for years without much problem, however in the past few days my outbound emails are not being sent and I have not changed any of the settings, except to recently update to ios7!!
im using the same mail.btinternet.com config in outbound and inbound and have tried changing the port numbers to those listed without success.
can you shed some light on why this has happened?
I recently moved my broadband away from bt but was told that as long as I continue to log in to webmail every 90 days I would still be able to access email, without the need to upgrade to their premium service.
many thanks
jeff
Hi Jeff,
I would double check with BT. It would be reasonable to assume that only customers can send email out via there outgoing mail servers. This type of restriction is common as it stops people without accounts sending huge volumes of spam via their outgoing servers.
What they said is true – as long as you use a browser to access your email and send them. However you won’t be able to do it using any email apps on your smartphone or computer.
Hope this helps!
Kevin, I hope you can help as I am about to be committed as my brain slowly turns to scrambled egg!
I have just incorporated my own company after being made redundant. I bought a domain via Go Daddy and set up my email account on my iMac, my tablet (Nexus 7) and my phone (Galaxy S4). For about three weeks, everything was fine but yesterday, my mail ceased to send messages, although it would receive. I was on chat with the Go Daddy support team in Arizona last night for hours and they were brilliant but couldn’t resolve the problem, citing the fact that it could be the ISP (SKY) blocking ports, or that I should use their recommended ports/servers instead.
My iMac is running on wireless here in the house, as are the tablet and phone, both of which are fine.
I was using pop.europe.secureserver.net for INCOMING and smtpout.europe.secureserver.net for OUTGOING and we tried all configurations of ports last night (110/995 IN and 80/3535/25/ 465 OUT) with and without SSL.
I am at my wits end, have been trawling through forums and trying everything, including your SKY recommended settings pop.tools.sky.com etc but am getting nowhere.
PLEASE can you help me out. I need my emails to work.
Bests, Len Bage
I feel your pain Len.
I would suggest talking to Sky to see if there has been any changes made on your broadband. The other thing to think about is whether you made any changes to your network connection or setup. Or perhaps a piece of software you installed did this without you realizing it? Something will have changed it is simply a process of elimination trying to figure out what it might be.
Failing that you might want to consider using time machine (if you use it) to roll back your mac to how it was before you started having all these problems.
Best of luck.
Hi,
Could you correct the IMAP settings for BT Internet please? You’ve listed the server as imap.mail.yahoo.com (993). Although this works at the moment, from late October 2013, the setting should be: mail.btinternet.com (993). Only SSL (port 993) will work and not the non-SSL IMAP port of 143.
Thanks for the info Damian.
Hi, I have an old iPod and just can’t seem to get or send mail.do I have to put in pop3? If so, what comes after that? I used the settings for virgin media but doesn’t seem to work. Thanks
trying to set up my son’s ipad with a student email called netmail.
His address is [email protected]
They don’t know what one hand is doing when they are looking at it.
Do you have anyway to get an outgoing and incoming server host names
Hi, the post office have recently changed their email hosting and now I am struggling to work out the imap/smtp addresses and ports, and whether or not it uses SSL! Can’t find any information on it in their FAQ or help section and have tried contacting their tech team, only to be on hold for over an hour. If you could find out what it is that would be much appreciated! Steve
Hi, please can someone help! Have and iphone4
Can recieve emails , but can’t send . AT&T network
Email address is Irish . Eircom.net
What out going server settings should i use?